One of the drawbacks of being an architect is that you don’t get to spend much time writing fun code, and you spend a lot of time writing boring documents. Luckily, Microsoft has kindly made using Visio, which is a product in the extended Office family that is used to draw diagrams (by far the most scrutinised parts of architectural documents), a bit like programming. I’ll demonstrate by going through the steps need to make a simple customisation of one of the Visio shapes.
Visio comes with two nice single-column tables, a 5 line one and a 15-line one. Here’s the 5 line one:

If you’re using the 5 line box and you want fewer than 5 lines, or you’re using the 15 line one and you want fewer than 15 lines you can just make make your box shorter, and the bottom lines will disappear. So, using the built-in shapes you can make any table with one column and up to fifteen rows. But if you need more than 15 rows you need to use programmer-like ingenuity. (Of course you could argue that if you’re putting tables that are that long into your diagram then you’re using the wrong tool and you should be linking to Excel, but I would argue that you were missing the point.)
I’m using Visio 2010 Professional here. Firstly you need to show the Developer toolbar. Go to the File tab in the ribbon, press Options, and on the Options dialogue press ‘Customize Ribbon’.

Now tick ‘Developer’ in the right-hand box and press ‘OK’.
Now open or create a diagram, and put a 15 ruled column on it. Do this by showing the Title Blocks shapes sheet (Shapes pane –> More Shapes –> Visio Extras –> Title Blocks) then selecting the 15 ruled column shape and dragging it to your diagram. (Unlike in Visual Studio, double-clicking the shapes doesn’t do anything.)
Now, right click your 15 ruled column on the diagram and click ‘Show ShapeSheet’. A pane like the following should appear:
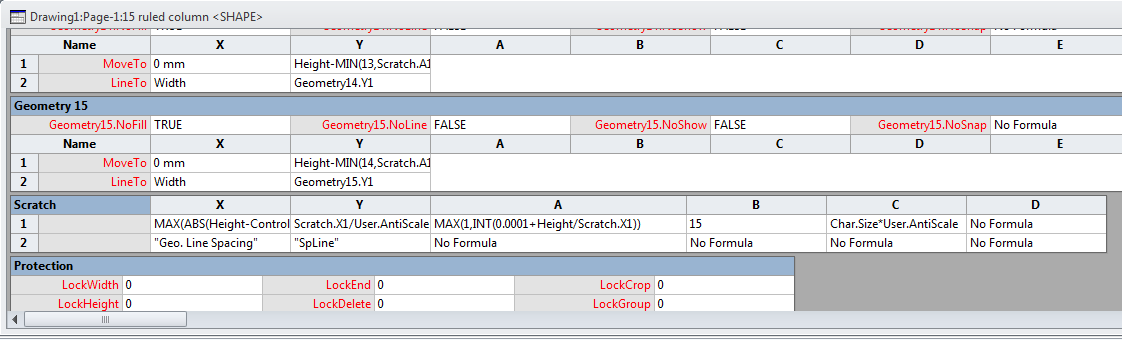
Scroll down to ‘Geometry 15’. ‘Geometry 15’ is the second-last horizontal line in the column. The idea is that we’re going to create a similar line but one row down.
Right click in the ShapeSheet pane and click ‘Insert Section’. The following dialogue will appear:

Tick ‘Geometry’ and press OK. You should see a new geometry section called ‘Geometry 16’ appear. I can’t pretend to know what all the values in this box mean, but making them almost the same as the values in Geometry 15 seems to work. So to this end,
- Select the cell next to Geometry16.NoSnap and F2 into it. Delete the contents and press Enter.
- Select the cell next to Geometry16.NoQuickDrag and F2 into it. Delete the contents and press Enter.
- Two rows down, select the cell under the X and next to ‘Move to’ and replace its contents with ‘=0’.
- In the cell to the right of this, replace the contents with ‘=Height-MIN(15,Scratch.A1)*Scratch.X1’. (It’s easiest to do this by copying the corresponding cell in Geometry 15 and changing the 14 to a 15.)
- Change the cell in column X next to ‘LineTo’ with ‘=Width’.
- Change the cell to the right of this with = ‘Geometry16.Y1’.
Here’s the final result:

Finally, you have to set some global variable in the shape to say that the outermost rectangle should be 16 lines high. Scroll down to the ‘Scratch’ section, which should be the section below Geometry16. Change cell B1 from 15 to 16.

Now you can close the pane, and, if you haven’t already done so, resize your 15 ruled column so that it’s large enough to show 16 lines.
I’m scrabbling round in the dark here: I really don’t know what I’m doing with Visio ShapeSheets. But I’m pleased that it’s a powerful enough product to be able to edit the built-in shapes in such detail. It gives me confidence that I’ll be able to draw what I want, and solve interesting problems while I do it. My job does have some perks!
